В третьей части статьи мы расскажем про изготовление головы, тела, рук и ног нашей куклы.In the third part of the article we will tell about the making of the head, body, hands and feet of our dolls.
Голова и телоHead and body
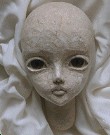
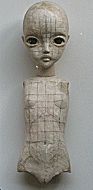
После того как вы проработаете черты лица, отшлифуйте поверхность шкуркой. Once you take action features, abrade the surface of the rind.
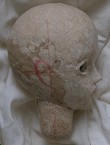
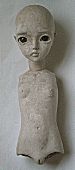
Нарисуйте внешнюю линию уха и сделайте уши из опилок и stoneclay . Сделайте дырочки для ног руг и шеи в торсовой части куклы и выскребите оттуда пеноплистироловый каркас. Draw the outer line of the ear and make the ears of sawdust and stoneclay. Make the holes for the legs and neck in pyr torsovoy of dolls and vyskrebite there penoplistirolovy frame.Зашлифуйте неровности шкуркой. Abrade uneven skin on.
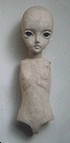
Вставьте голову в отверстие для шеи и проверьте баланс. Insert the head in the hole for the neck, and check the balance.
Начертите границы на поверхности для проверки симметрии и неровностей.Draw a border on the surface to check the symmetry and irregularities.
Проработайте детали и отшлифуйте поверхность. Work through the details and abrade the surface.
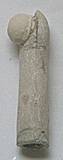
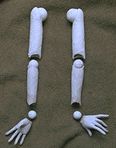
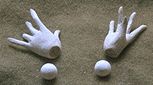
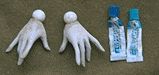
РукиHands
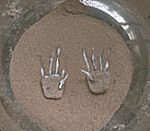
Насыпьте в чашку немного грубых опилок. Sprinkle in a little cup of coarse sawdust.Намажьте проволочный каркас клеем, положите заготовки рук в чашку и облепите их опилками. Spread wire frame with glue, put a piece of hands in a cup and stick to their filings.
После высыхания проработайте детали опилками, смешанными со stoneclay . After drying, the detail sawdust mixed with stoneclay.
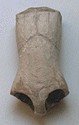
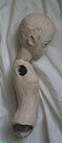
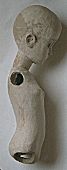
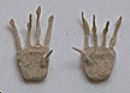
Разрежьте руки в локтях. Cut the elbows.Вставьте соединительные шарики в отверстие в плечах и на локтях и скрепите детали. Insert the connecting balls into the hole in the shoulders and elbows, and seal parts.
Отшлифуйте поверхность шкуркой, затем налепите сверху stoneclay , чтобы сделать поверхность гладкой. Abrade the surface of the skin on, then stick the top stoneclay, to make the surface smooth.
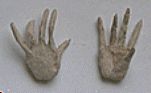
Вырежьте дырочки в запястьях и приклейте туда соединительные шарики эпоксидной резиной Cut holes in the wrists and glue there connecting with epoxy rubber balls
В местах соединения подрежьте края соединений в направлении плавного сгиба деталей.In junctions prune edge connections in the direction of the smooth folds of the details.
НогиFeet
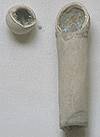
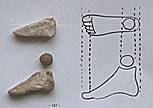
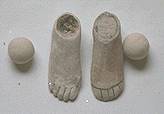
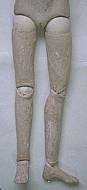
Нарисуйте эскиз ног и сделайте основу из опилок. Draw a sketch of the feet and make the basis of sawdust.Затем проработайте детали смесью опилок и stonaclay . Then work out the details with a mixture of sawdust and stonaclay.Вырежьте дырочки (как в запястьях) и приклейте к ним соединительные шарики. Cut a hole (as in the wrists) and glue them to the connecting balls.
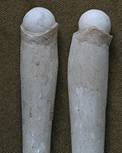
Зафиксируйте соединительные шарики так же на верху бедер и в коленях. Secure the connecting balls the same way at the top of the hips and knees.
Проверьте соразмерность каждой части, отшлифуйте поверхность и при помощи stonaclay сделайте ее гладкой. Check the proportionality of each part, abrade the surface and with the help stonaclay make it smooth.


 Библиотека : Куклы Library: Dolls