

|
|
|
|
News |
Articles |
Recipes |
Dream book |
Daily Horoscope |
Magazines |
Galleries |
Books
|
Needlework | |
||
|
|
|
 Библиотека : Куклы Library: Dolls Библиотека : Куклы Library: Dolls Мастер-класс: Изготовление подвижной в “суставах” куклы из фарфора методом литья в гипсовые формы Master Class: The Making of a mobile in the "joints" dolls from porcelain by casting in plaster moldsСовременные материалы, такие как полимерные глины (Fimo, Cernit и др.), позволяют создать авторскую куклу практически за один день и не требуют сложного обжига в специальных печах. Modern materials such as polymer clay (Fimo, Cernit, etc.), allow the author to create a doll for almost a day and do not require complex firing in special kilns. Это дает необычайные творческие возможности современному художнику-кукольнику. It gives extraordinary creative possibilities of modern artist-puppeteer.Фарфор же - материал сложный, работа над куклой из него может занять месяцы. Porcelain same - a complex material, work on the doll out of it can take months. Но эта несовременная “неторопливость” с лихвой окупается красотой и изяществом этого прекрасного материала. But this untimely "slowness" is more than compensated the beauty and elegance of this wonderful material. Недаром из него традиционно создают куклы и статуэтки. Wonder of it traditionally create dolls and figurines. Кроме того, твердость фарфора позволяет сделать подвижными суставы куклы, а технология литья в формы – небольшие тиражи как отдельных деталей (тельце, ножки), так и всей куклы. In addition, the hardness of porcelain allows you to make movable joints dolls, and the technology of casting in forms - short runs as separate parts (body, legs), and all the dolls. 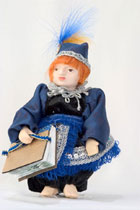 Этап 1. Подготовка модели Step 1. Preparing Сначала создаем образ куклы: в эскизе на бумаге или в своем воображении. First, create the image of the dolls: a sketch on paper or in your imagination. Решаем, в каких суставах нужна подвижность и как будут соединяться отдельные части, рисуем схему куклы. Decide in which joint mobility is needed and how they will connect separate parts, draw a diagram dolls. Если высота куклы не превышает 30 см, достаточно подвижности в шейном, плечевом и бедренном “суставах”. If the height of the doll does not exceed 30 cm, sufficient mobility in the neck, shoulder and hip "joint." Если кукла гораздо больше – имеет смысл сделать подвижными еще колени , локти, кисти и стопы. If the doll is much more - it makes sense to make moving more knees, elbows, hands and feet. При таких размерах следует учесть еще и рабочий объем печи для обжига – чтобы все детали могли быть обожжены по возможности за один раз. When such a scale should be considered further and a working volume of kiln - that all details can be burned as possible at one time. На стадии рабочего чертежа имеет смысл решить, каким образом все части тела куклы будут соединены, где будут крепления, отверстия и т.д., потому что все эти вспомогательные элементы проще сделать, пока фарфор сырой; высохнув, он станет хрупким, а после обжига слишком твердым для сверления. At the stage of drawing makes sense to consider how all the parts of the body dolls will be connected, where there will be mounting, holes, etc., because all these supporting elements easier to do, until the raw porcelain; vysohnuv, it becomes brittle, and after firing too hard for drilling. Предлагаю для начала сделать небольшую куклу с подвижной головой, ручками и ножками. I propose to begin to make a small doll with movable head, arms and legs. Крепления конечностей – по принципу пуговиц “на ножке”, где вместо ниток используется резиновый шнур или шляпная резинка, а “пришиваются” они к телу. Mounts limbs - on the principle of buttons "on the leg", where instead of threads used rubber cord or rubber hat, and "sewn" them to the body. 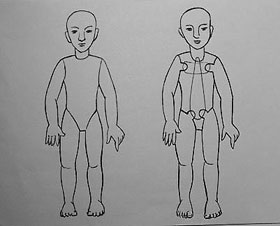 Лепим отдельные детали куклы (вместе с креплениями) из пластилина, глины, паперклея или другого материала. Lepim individual details dolls (with bindings) from plasticine, clay, paperkleya or other material. Каждую деталь нужно зашлифовать (загладить), т.к. Every detail should be sanded (atone), because все неровности перейдут в фарфоровую отливку. All irregularities will be transferred to the porcelain casting. Детали из паперклея имеет смысл покрыть лаком. Details of paperkleya sense lacquered. Теперь модели отдельных частей нашей куклы готовы, но нужно учесть, в какой части детали будет отверстие для заливки фарфора, чтобы его не было видно на готовой кукле. Now the model of individual parts of our dolls are ready, but we must take into account what part of the details will be opening for pouring porcelain that was not visible on the finished doll. В нашем случае отверстие в головке закроют волосы , а в плечах, бедрах и туловище – одежда . In our case, the hole in the head will close the hair, and in the shoulders, hips and torso - clothes. Долепливаем к деталям куклы дополнительно литник - на его месте в форме будет воронка, через которую будем заливать жидкий фарфор– шликер . Doleplivaem to detail dolls additional intake - in its place will be in the form of a funnel, through which we pour liquid porcelain-slurry. 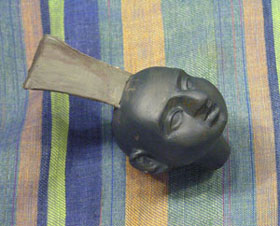 Каждую модель делим линией на 2-3 части, стараясь, чтобы она проходила по местам наиболее сложного рельефа, иначе не избежать “травмирования” модели при вынимании ее из формы. Every model we divide the line into 2-3 parts, trying to make it passed the places most complex relief, otherwise avoid "injury" model when removing it from the form. На сколько частей мы разбиваем модель, столько частей-кусков будет в гипсовой форме. Into how many parts we break model, so many parts, pieces will be in the form of gypsum. У нас все детали удалось разделить на 2 части, значит форма для отливки каждой из них будет иметь 2 куска. We have all the details have divided into 2 parts, then mold each of them will have 2 pieces. В модели головы куклы линия проходит в плоскости крепления ушей, в руках и ногах – по боковой плоскости. In the model head doll line runs in the plane of mounting ears, hands and feet - on the lateral plane. 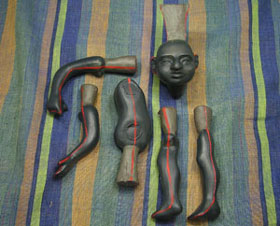 Этап 2. Снятие формы Step 2. Withdrawal form Готовим подмодельник из оконной замазки или пластилина, “замуровав” в него нашу модель по размеченной линии так, чтобы над его поверхностью осталась часть, с которой снимается первый кусок формы. Cooking podmodelnik of putty or plasticine, "bricked" it our model on marked line so that its surface above the rest, which removed the first piece of form. Обратной стороной карандаша делаем в подмодельнике выемки – это замки формы для соединения ее частей. The flip side of a pencil are doing in podmodelnike seizure - it locks the form for the connection of its parts. По краям делаем бортики из дощечек или пластилина. Along the edges of planks do bumpers or plasticine. 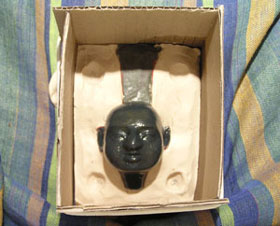 Готовим гипс: в воду добавляем примерно равный объем гипса, взбиваем стеком или ножом, как тесто на оладьи или блины. Cooking gypsum: in the water add approximately an equal amount of gypsum, whips a stack or a knife as the dough into fritters or pancakes. Ждем с минуту и заливаем в подмодельник, следя за тем, чтобы на поверхности модели не осталось пузырьков воздуха. We are waiting for a moment and fill in podmodelnik, making sure that on the surface of the model no air bubble. После застывания первая часть формы готова. After freezing the first portion of the form is ready. 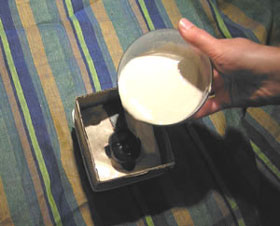 Снимаем подмодельник. We remove podmodelnik. Деталь формы смазываем вазелином или другой смазкой, чтобы предотвратить склеивание кусков формы. Detail form lubricates Vaseline or another lubricant to prevent bonding pieces form. Делаем бортики и заливаем гипс. Making collars and pour plaster of Paris. 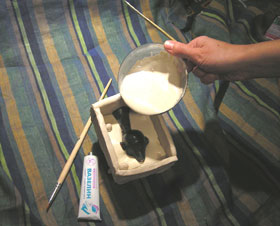 Разнимаем куски формы, достаем модель, зачищаем края формы. Pull apart pieces of the form, we obtain the model, we clean the edge forms. Форма готова, но ее нужно высушить при комнатной температуре в течение 2-3 дней. The form is ready, but it must be dried at room temperature for 2-3 days. Этап 3. Литье фарфоровой детали Step 3. Casting porcelain parts Сухую форму собираем и скрепляем тугой резинкой (из велосипедной камеры, например) или проволокой по вертикали и по горизонтали и ставим отверстием литника вверх. The dry form and gather together the tight rubber band (from bicycle inner tube, for example) or wire vertically and horizontally, and put a hole runner up. Наступило время заливки в форму фарфора. The time filling in the form of china. Фарфор лучше брать тонированный, потому что в готовом виде покрасить его ровно очень трудно. Porcelain is better to take stained, because ready-made paint it exactly very difficult. Фарфоровый шликер хорошо перемешиваем и заливаем в отверстие литника до краев формы. Porcelain slurry mix well and pour into the hole runner up to the brim shape. Льем медленно, чтобы не осталось воздушных полостей и пузырьков. Lem slowly, so that no more air pockets and bubbles. 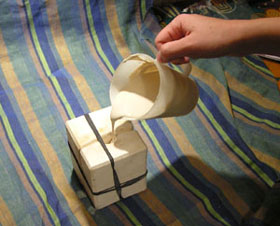 Ждем 1-5 минут в зависимости от диаметра литника и свойств шликера, пока фарфоровая деталь внутри формы не наберет необходимую толщину (обычно 2-3 мм). We wait for 1-5 minutes, depending on the diameter of the sprue and properties of the slurry, while porcelain detail within the form will not gather the required thickness (usually 2-3 mm). После этого оставшийся шликер из формы сливаем, иначе деталь не будет полой и может деформироваться при сушке и обжиге. After that, the remainder of the slurry forms merge, otherwise the item will not be hollow and may be deformed during drying and firing. Через 1-3 часа снимаем резинки и аккуратно разнимаем форму. After 1-3 hours remove gum and gently pull apart the form. 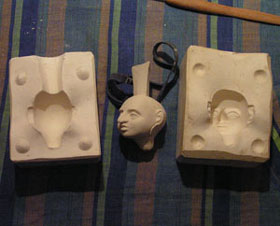 Вот она, наша деталь! That is our part! Осторожно, она еще мягкая, на ней могут оставить следы даже пальцы. Carefully, she still soft, for it can leave traces of even the fingers. Аккуратно вынимаем ее, срезаем литник и делаем отверстия согласно схеме. Carefully take out her, cut off intake and make the holes according to the scheme. Важно сделать их до высыхания – потом это практически невозможно без повреждения фарфоровой детали! It is important to make them to dry - then it is virtually impossible without damaging the porcelain parts! Вот готовы все наши детали: тельце, ручки, ножки и голова куклы. Here are ready to all our details: body, hands, legs and head dolls. Теперь их надо высушить. Now they have to be dried. На них остались “швы” от формы. They were the "seams" on the form. Их необходимо зашлифовать до обжига, после него фарфор станет прочнее камня. They need to be sanded before firing, after it becomes stronger porcelain stone. Сделать это можно мелкой наждачной бумагой или куском капронового чулка. You can do this fine sandpaper or a piece of nylon stocking. 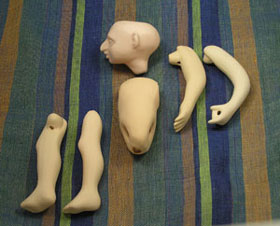 Обжиг фарфора происходит по сложной схеме набора и снижения температуры. Firing porcelain is a complex pattern of recruitment and reduce the temperature. Он может занять 10-12 и даже более часов, все зависит от вида фарфора и печи. It can take 10-12 or more hours, it all depends on the type of porcelain kiln. Но вот все детали обожжены. But all the details of burnt. Раскрасим лицо куклы. Let's give the person a doll. Можно использовать простую ПВА-темперу или специальные керамические краски, требующие высокотемпературного обжига. You can use a simple PVA-tempera or special ceramic paint that require high-temperature firing. Но мне нравятся акриловые краски для керамики и фарфора – они обжигаются в обычной духовке, а блеск и текстура у них “интеллигентней”, чем у темперы. But I like acrylic paints for ceramics and porcelain - are baked in conventional oven, and shine and texture of their "intelligent" than tempera. 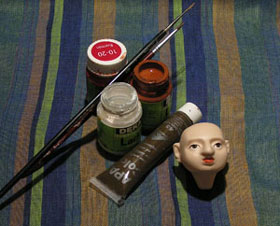 Собираем куклу, продевая в отверстия резиновый шнур. We collect the doll, prodevaya holes in the rubber cord. Одним отрезком шнура крепим к телу обе руки, связав его концы через отверстие для головы. One segment of the cord attaches to the body with both hands, tying the ends through the hole for the head. Другим отрезком крепим голову и ноги. Another segment attaches the head and legs. Чтобы петля не проскальзывала в отверстии в шее куклы, проденем ее в металлическую шайбу соответствующего размера. That the loop does not slip into the hole in the neck dolls prodenem it in a metal washer of appropriate size. Концы резинки свяжем через отверстие литника внизу тела куклы. The ends of the elastic contact through sprue hole at the bottom of the body dolls. 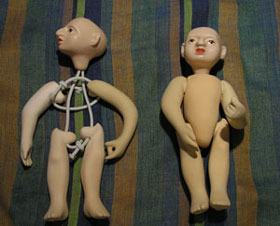 Вот, “фарфоровая” часть работы над куклой завершена. Here, "china" part of the work on the doll is completed. Осталась самая интересная и творческая - одеть куклу, сделать прическу, подобрать аксессуары . Except one interesting and creative - to dress the doll, hair done, pick up accessories. Творческих успехов! Creative successes! Приглашаю Вас зайти на мой сайт http://www.artdoll.ru/ . I invite you to visit my site http://www.artdoll.ru/. На нем Вы увидите куклы, созданные в этой и других техниках. On it you will see dolls that are created in this and other techniques. Уважаемые дамы! Ladies! Заходите на наш форум "Куклы" и задавайте Галине Ишимикли интересующие Вас вопросы. Come to our forum "Dolls" and ask Galina Ishimikli your questions.
Свежие статьи в рубрике «Куклы»: Художественный проект КУКЛЫ МИРА , Мастер-класс. Fresh articles in the category "Dolls": art project DOLLS OF THE WORLD, Master Class. Изготовление летней феечки , "Кума 2013" , Стадии лепки тела куклы , Лепка «японской» куклы на шарнирах , Лепка головы , Культура и искусство Японии , Куклы – это серьезно? , Мастер-класс Натальи Горбуновой , Кукла на шарнирах. Production year feechki, "Kuma 2013, Stages of body sculpting dolls, Molding" Japanese "doll on hinges, Molding the head, Art and Culture of Japan, dolls - is it serious?, Master Class Natalia Gorbunova, Doll on hinges. Часть 4 Part 4 |
|
|||||||||||||||||||||||||||||||||||||||||||||||||||||
 |
© 2004-2024 Porcelain doll цена|книги по изготовлению кукол из холодной керамики скачать бесплатно через торрент|polymer clay dolls masterclass|кукла из гипса|как сделать гипсовые формы для куклы|гипсовая кукла мастер класс|гипсовая форма|форма для кукол|modelling clay fimo air|гипсовая форма для кукол|как сделать подвижные суставы кукле из папер|гипсовая форма для куклы|создание гипсовой формы куклы|galina ishimikli step by step|гипсовые формы для кукол|stack гипс свойства|мастер класс по изготовлению кукол|author doll master class|all for doll мастер класс Journal of the modern woman Pani.kiev.ua , reprint of materials allowed only with the immediate link to / at mandatory notification editorial on e-mail. Editor project For general and administrative questions, please contact |