

|
|
|
|
News |
Articles |
Recipes |
Dream book |
Daily Horoscope |
Magazines |
Galleries |
Books
|
Needlework | |
||
|
|
|
 Библиотека : Куклы Library: Dolls Библиотека : Куклы Library: Dolls Лепка «японской» куклы на шарнирах Modeling "Japanese" doll hingedСтатья о кукле на шарнирах вызвала живой интерес у наших читателей. Article about the doll on hinges aroused great interest among our readers. По их просьбе мы публикуем постадийную инструкцию лепки такой куклы на основе материалов сайта www.ne.jp/asahi/haru/doll/make/makeindex.htm , подготовленную для Вас Галиной Ишимикли. At their request, we will publish a stepwise instruction sculpting dolls based on material from the site www.ne.jp / Asahi / haru / doll / make / makeindex.htm, prepared for you Galina Ishimikli.Стадии лепки головы куклы Stages molding head doll 1. 1. Формируем из фольги голову куклы размером немного меньше желаемого, оборачиваем мягкой пленкой для того, чтобы потом было легче удалить эту основу. Form a foil head doll size slightly smaller than desired, wrap a soft film to make it easier to remove later this basis. 2. 2. Покрываем лицевую часть материалом, формируя глазные впадины и намечая глаза (рис. 1). Covers the front part of the material, forming the eye sockets and outlining the eye (Fig. 1). Рис. Fig. 1 1 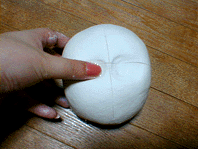 3. 3. Добавляем материал для носа, лепим спинку и крылья носа, формируем ноздри (рис. 2, 3, 4). Add the material for the nose, lepim back and wings of the nose, forming the nostrils (Fig. 2, 3, 4). Рис. Fig. 2 2 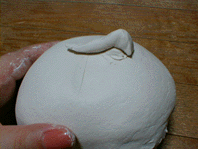 Рис. Fig. 3 3 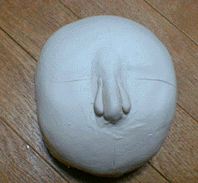 Рис. Fig. 4 4 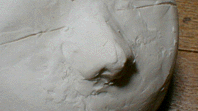 4. 4. Добавляем материал для верхней губы, формируем ее, не забывая все три ее части: две боковые и серединный бугорок и то, что губа располагается по дуге; лепим подносовую бороздку (рис. 5,6). Add material to the upper lip, forming it, not forgetting all its three parts: two lateral and medial tubercle and the fact that Bay is located on an arc; lepim podnosovuyu groove (Fig. 5.6). Рис. Fig. 5 5 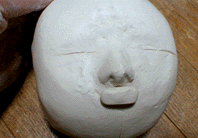 Рис. Fig. 6 6 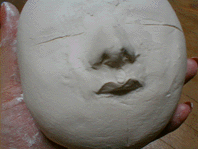 5. 5. Лепим нижнюю губу из дополнительного кусочка материала, не забывая о срединной бороздке и двух боковых долях (рис. 7). Lepim lower lip of an additional piece of material, not forgetting the median groove and two lateral lobes (Fig. 7). Рис. Fig. 7 7 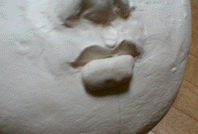 6. 6. Добавляем материал для подбородка, лепим его и ямку под нижней губой (рис. 8, 9). Add material to the chin, lepim it and a hole under the lower lip (Fig. 8, 9). Рис. Fig. 8 8 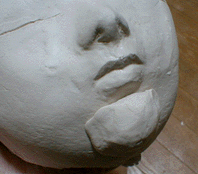 Рис. Fig. 9 9 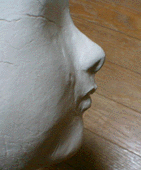 7. 7. Добавляем два куска соответствующей формы для щек и формируем их (рис. 10, 11). Add two pieces of the appropriate form for the cheeks and forming them (Fig. 10, 11). Рис. Fig. 10 10  Рис. Fig. 11 11 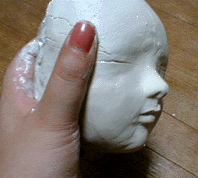 8. 8. Покрываем материалом оставшиеся части головы (рис.12). Covers the material of the remaining part of the head (Fig. 12). Рис. Fig. 12 12 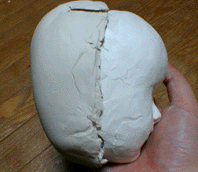 9. 9. Теперь разнимаем две детали головы и вынимаем основу из фольги, прорезаем отверстия для глаз (рис. 13, 14). Now separates the two parts of the head and take out the basis of the foil, cut a hole for the eyes (Fig. 13, 14). Рис. Fig. 13 13  Рис. Fig. 14 14 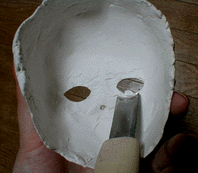 10. 10. С внутренней стороны вставляем глаза, закрепляем их; если материал требует обжига, глаза следует закреплять после него (рис. 15). On the inside of the eye insert, we anchor them, if the material requires the burning of the eyes should be enhanced after it (Fig. 15). Рис. Fig. 15 15 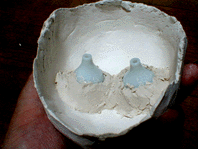 11. 11. Добавляем материал для век, формируем верхние и нижние веки, проверяем симметрию (рис. 16, 17). Add the material to age, form the upper and lower eyelids, check the symmetry (Fig. 16, 17). Рис. Fig. 16 16 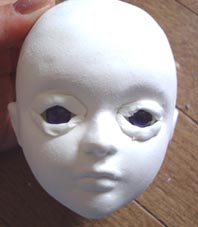 Рис. Fig. 17 17 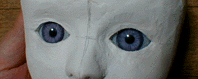 12. 12. Добавляем три кусочка материала, формируем лоб (рис. 18, 19, 20). Add three pieces of material forming the forehead (Fig. 18, 19, 20). Рис. Fig. 18 18 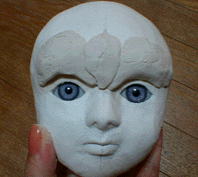 Рис. Fig. 19 19 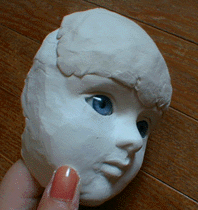 Рис. Fig. 20 20 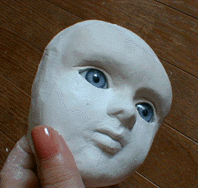 13. 13. Аккуратно срезаем материал с краев лицевой и затылочной части головы, складываем их, скрепляем материалом, разглаживаем шов (рис. 21, 22). Carefully we cut off the material from the edges of the front and back of the head, we add them together the material smooths the seam (Fig. 21, 22). Рис. Fig. 21 21 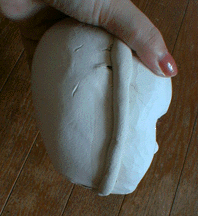 Рис. Fig. 22 22 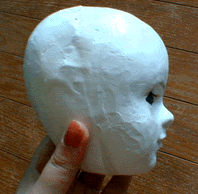 13. 13. Прорезаем отверстие для крепления шеи. Cut a hole for fastening the neck. Лепим шею, используя специальную основу или подходящий по форме предмет, например, колпачок от губной помады, не забыв предварительно проделать в нем отверстие для крепления (рис. 23, 24). Lepim neck, using an ad hoc basis or on a suitable form object such as a cap on the lipstick, not forgetting to do it first hole mounting (Fig. 23, 24). Рис. Fig. 23 23 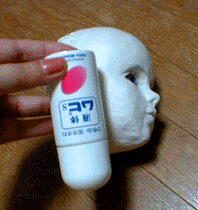 Рис. Fig. 24 24 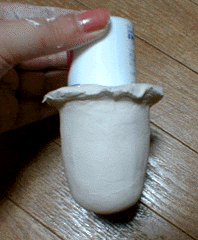 14. 14. Прикрепляем шею , намечаем места отверстий для ушей (рис. 25). Attach the neck, are planning to place the holes for the ears (Fig. 25). Рис. Fig. 25 25 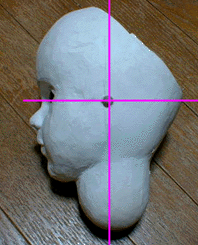 15. 15. Лепим уши на стерженьках (рис. 26). Lepim ears on the rod (Fig. 26). Рис. Fig. 26 26 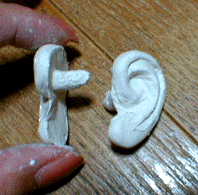 16. 16. Прикрепляем уши, выравниваем материал, сушим и шлифуем голову; в качестве монтажного отверстия для соединения с телом срезаем «крышку» с макушки головы (рис. 27). Attach ears and equalize the material, grinding and drying our head, as the mounting holes for connection to the body we cut off "cover" from the top of the head (Fig. 27). Рис. Fig. 27 27 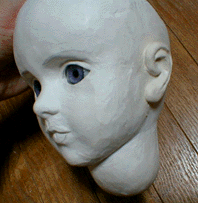 Примечание Note В оригинале кукла лепится из StoneClay, но подойдет и другой материал, достаточно прочный, чтобы выдержать трение деталей и давление резинового шнура. In the original doll lepitsya of StoneClay, but the suit and other material strong enough to withstand the pressure and friction parts of rubber cord. Кроме того, вышеизложенное руководство можно использовать при лепке головы куклы из любых материалов. In addition, the above guidance can be used for sculpting head dolls of any materials. На занятиях в Школе Кукольного Мастерства я использую эту методику для обучения лепке головы из PaperClay, хотя он недостаточно прочен для изготовления куклы на шарнирах. In the classroom Puppet Mastery I use this technique to study sculpting the head of PaperClay, although he is strong enough to make dolls on hinges. Буду рада ответить на Ваши вопросы в Комментариях или на Форуме . I would be glad to answer your questions in comments or on the Forum. Галина Ишимикли www.artdoll.ru Galina Ishimikli www.artdoll.ru
Свежие статьи в рубрике «Куклы»: Художественный проект КУКЛЫ МИРА , Мастер-класс. Fresh articles in the category "Dolls": art project DOLLS OF THE WORLD, Master Class. Изготовление летней феечки , "Кума 2013" , Стадии лепки тела куклы , Мастер-класс: Изготовление подвижной в “суставах” куклы из фарфора методом литья в гипсовые формы , Лепка головы , Культура и искусство Японии , Куклы – это серьезно? , Мастер-класс Натальи Горбуновой , Кукла на шарнирах. Production year feechki, "Kuma 2013, Stages of body sculpting dolls, Master Class: The Making of a mobile" joints "dolls from porcelain by casting in plaster molds, Molding the head, Art and Culture of Japan, dolls - is it serious?, Master Class Natalia Gorbunova, Doll on hinges. Часть 4 Part 4 |
|
||||||||||||||||||||||||||||||||||||||||||||||||||||
 |
© 2004-2024 Молдинги-куклы|что такое молдинг куклы|что такое молдинг для кукол|губы лепка у куклы|www.ne.jp/asahi/haru/doll/make/makeindex.htm,|молдинг кукол|резиновая кукла japanezi|лепка головы куклы|www.ne.jp/asahi/haru/doll/make/makeindex...|how to make a hinge doll|кукла слепить самому|как слепить ухо человека|как лепить из полимерной глины человека|как лепить нос кукле|заготовка головы куклы из фольги|как лепить голову куклы из пластики|из чего лепить кукол|how to make a collector s hinge doll|из чего делают голову куклам|Женский журнал. Статьи, рецепты, сонник, гороскоп, женские, журналы, женские сайты, красота, женское здоровье, мода. Journal of the modern woman Pani.kiev.ua , reprint of materials allowed only with the immediate link to / at mandatory notification editorial on e-mail. Editor project For general and administrative questions, please contact |