

|
|
|
|
News |
Articles |
Recipes |
Dream book |
Daily Horoscope |
Magazines |
Galleries |
Books
|
Needlework | |
||
|
|
|
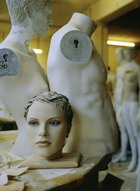 Библиотека : Куклы Library: Dolls Библиотека : Куклы Library: Dolls Стадии лепки тела куклы Stages of body sculpting dollsУважаемые читательницы! Dear readers! Мы продолжаем серию статей Галины Ишимикли про лепку куклы на шарнирах. We continue a series of articles by Galina Ishimikli about sculpting dolls on hinges.1. 1. Как и при лепке головы куклы, из жатой фольги или другого подходящего материала формируем тело размером немного меньше требуемого, оборачиваем его пленкой, чтобы облегчить последующее вынимание. How and when sculpting head doll from zhatoy foil or other suitable material forming a body size slightly less than desired, wrap his film, to facilitate the extraction of follow-up.   2. 2. Покрываем основу материалом, формируя прогиб в области поясницы , плавное скругление в области низа живота, ягодиц и плеч; плоскости прикрепления рук не параллельны, а проходят под небольшим углом в сторону груди. Covers the basis of material, forming a trough in the waist, smooth rounding of the bottom of the abdomen, buttocks and shoulders, the plane of attachment arms are not parallel, but are at a slight angle to the side of his chest.    3. 3. Добавляя материал, создаем необходимые выпуклости в области ягодиц, лопаток, живота и груди, а с помощью стека - углубление вдоль позвоночника на спине. Adding material, create the necessary convexity of the buttocks, shoulder blades, stomach and chest, and with the help of the stack - deepening along the spine on the back.   4. 4. В зависимости от пола и «возраста» куклы, прорабатываем детали. Depending on sex and age "dolls, are working on the details.   5. 5. Разрезаем деталь по боковой поверхности, вынимаем вспомогательный материал, соединяем переднюю и заднюю половинки, заглаживаем соединение. Cut part of the lateral surface, take out the supporting material, connect the front and rear halves, wipe out the connection. Лепка ног куклы Modeling foot dolls 1. 1. Формируем ноги куклы, вставив внутрь полые трубки достаточно большого диаметра из гибкого материала, позволяющего создать правильную форму ног и небольшой изгиб в области колена. Form a foot dolls, inserting into the hollow tube of sufficiently large diameter of the flexible material that would generate the correct form of legs and a small bend in the knee.    2. 2. Лепим стопы: формируем стопу, напоминающую неправильную треугольную пирамиду со сглаженными гранями и углами, вставляем куски проволоки для каркаса пальцев и петлю для крепления в области лодыжки. Lepim foot: forming a foot, reminiscent of an irregular triangular pyramid with smooth edges and corners, insert pieces of wire for the skeleton fingers and loop for fastening on the ankle.    3. 3. Лепим пальцы ног и пятку, скругляем место соединения лодыжки с голенью. Lepim toes and heel, rounded the place of the ankle with the shin.   4. 4. Со стороны подошвы формируем подушечки пальцев и подушку на поперечном крае стопы из дополнительного материала. From the side of the foot pads of the fingers and form a cushion at the equatorial region of the foot of additional material.   Лепка рук куклы Modeling hand puppets 1. 1. Формируем руку , учитывая взаимное расположение и форму плеча и предплечья, вставив полые трубки, как в ногах. Form a hand, given the relative position and shape of the shoulder and forearm, inserting a hollow tube, as in the legs.   2. 2. Лепим кисть руки, которая примерно равна лицевой части головы куклы: сначала формируем ладонь треугольной формы, закрепляя куски проволоки для каркаса пальцев. Lepim hand, which is approximately equal to the front of the head dolls: first, forming a triangular palm, fastening pieces of wire for the skeleton fingers.   3. 3. Затем лепим пальцы, обращая внимание, что основание большого пальца находится ниже других, расположенных на одной дуге; со стороны ладони из дополнительного материала формируем подушечку у основания большого пальца и выступы других пальцев с подушечкой у основания мизинца. Then lepim fingers, noting that the base of the thumb is below the other, located on the same arc, from the palm of the supplementary material forming a cushion at the base of the thumb and other fingers of the tabs with a cushion at the base of the little finger.  4. 4. В месте соединения ладони и предплечья формируем шар с петелькой для крепления. At the junction of the hands and forearms form a ball with a loop for fastening.  Крепление конечностей к телу Mounting the extremities of the body 1. 1. Срезаем ноги вверху под углом, соответстующим плоскости соединения тела и ног, формируем два шарика и два отверстия в теле, соответствующие им по форме и размеру. We cut off the legs at the top at an angle that conform to the plane of the connection of the body and legs, form two balls and two holes in the body, corresponding in shape and size.    2. 2. Формируем два шарика, соответствующие по размеру верхней мышце руки – акромиону, соединяем их с деталью руки, срезав предварительно излишек длины. We form two spheres, corresponding to the size of the upper muscle of hand - acromion, combine them with the detail of the hand, cut off excess length previously.   3. 3. Разрезаем деталь ноги примерно посередине для коленного сустава. Cut the legs approximately in the middle part to the knee joint.    4. 4. Из шарика, добавленного к нижней части ноги, соответствующей голени и соответствующего отверстия в «бедре» формируем коленный сустав. Of the ball, added to the bottom of the feet, legs and the corresponding respective openings in the "hip" form the knee joint.    5. 5. Аналогичным способом формируем локтевой сустав на руках. In the same way to form the elbow on his hands. 6. 6. Для крепления головы к телу, формируем в нем отверстие, соответствующее по форме и размеру шее куклы. To mount the head to the body, forming a hole in it corresponding to the shape and size of the doll's neck.   7. 7. Формируем шарик, по размеру соответствующий внутреннему диаметру шеи, но меньший, чем отверстие в ней, закрепляем здесь крючок для крепления головы к телу; шарик вставляем в деталь головы, крючок выводим в отверстие в шее. Form a ball the size of the corresponding inner diameter of the neck, but smaller than a hole in it, here we fix a hook for attaching the head to the body, insert the ball into the part of the head, displaying a hook in a hole in his neck.   Сборка куклы Assembling dolls 1. 1. Во всех суставах проверяем соответствие шариков и отверстий по форме и размеру. In all joints, checking to make sure the balls and holes in shape and size. 2. 2. Сгибая конечности в суставах и учитывая степень свободы каждого из них, намечаем и проделываем соответствующие отверстия в шариках. Bending limb joints and taking into account the degree of freedom of each of them, we envisage and done a corresponding holes in the balls.   3. 3. Отрезаем два куска резинового шнура или очень толстой шляпной резинки, соотнося их длину с размерами куклы; один отрезок в 2 сложения проходит от запястья через предплечье-плечо-тело-плечо-предплечье ко второму запястью, второй – от щиколотки через лодыжку-бедро-тело-крючок в области шея-тело-бедро-лодыжка ко второй щиколотке), учитывая необходимую степень натяжения. Cut out two pieces of rubber cord or a very thick hat gum, comparing their length with the dimensions of dolls, one segment in 2 additions runs from the wrist through the forearm, shoulder, body, shoulder, forearm, wrist to the second, the second - from the ankles through the ankle-hip-body -hook in the neck-body-thigh-ankle to the second ankle), given the necessary degree of tension.  4. 4. С помощью длинного крючка с поперечной ручкой протягиваем резинку сквозь детали правой ноги, тело и детали левой ноги и связываем концы резинки. With a long hook with a transverse handle extending a rubber band through the details of the right leg, body and parts of the left leg and connect the ends of the gum.   5. 5. Крючком зацепляем резинку через отверстие для крепления шеи, вытягиваем ее и накидываем на крючок в детали головы. Gears gum hook through the hole for attaching the neck, pulling her and jumped on the hook in the details of the head.  6. 6. С помощью второй резинки присоединяем руки; кукла готова к тонированию лица, наклейке волос и одеванию. With the second gum adjoin hands doll is ready to face toning, sticker hair and dressing.  Буду рада ответить на Ваши вопросы в Комментариях или на Форуме . I would be glad to answer your questions in comments or on the Forum. Галина Ишимикли www.artdoll.ru Galina Ishimikli www.artdoll.ru
Свежие статьи в рубрике «Куклы»: Художественный проект КУКЛЫ МИРА , Мастер-класс. Fresh articles in the category "Dolls": art project DOLLS OF THE WORLD, Master Class. Изготовление летней феечки , "Кума 2013" , Лепка «японской» куклы на шарнирах , Мастер-класс: Изготовление подвижной в “суставах” куклы из фарфора методом литья в гипсовые формы , Лепка головы , Культура и искусство Японии , Куклы – это серьезно? , Мастер-класс Натальи Горбуновой , Кукла на шарнирах. Production year feechki, "Kuma 2013", Molding "Japanese" doll on hinges, Master Class: The Making of a mobile "joints" dolls from porcelain by casting in plaster molds, Molding the head, Art and Culture of Japan, dolls - is it serious?, Masterclass Natalia Gorbunova, Doll on hinges. Часть 4 Part 4 |
|
||||||||||||||||||||||||||||||||||||||||||||||||||||
 |
© 2004-2024 Sculpting face with edge loops|куклы на шарнирах мастер класс|stacks for plastic materials for sculpting dolls|attachment arm крепление|doll s body and face sculpting|sculpting dolls|серию статей галины ишимикли про лепку куклы на шарнирах.|Женский журнал. Статьи, рецепты, сонник, гороскоп, женские, журналы, женские сайты, красота, женское здоровье, мода. Journal of the modern woman Pani.kiev.ua , reprint of materials allowed only with the immediate link to / at mandatory notification editorial on e-mail. Editor project For general and administrative questions, please contact |