

|
|
|
|
News |
Articles |
Recipes |
Dream book |
Daily Horoscope |
Magazines |
Galleries |
Books
|
Needlework | |
||
|
|
|
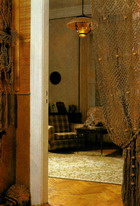 Рукоделие : Плетение Needlework: Weaving Рукоделие : Плетение Needlework: Weaving Плетеная штора (60Х200 см) Wicker shade (60H200 cm)Для работы потребуется пеньковая веревка толщиной 3 мм, 31 деревянный шарик и металлическая планка длиной 60 см. For work required hemp rope 3 mm thick, 31 wooden ball and a metal strip in the length of 60 cm1 . 1. Нарежьте 50 нитей по 18 м, сложите каждую пополам и закрепите на планке (рис. 1) — получилось 100 концов по 9 м. Cut 50 strands of 18 meters, fold each in half and secure to a bracket (Fig. 1) - get 100 all to 9 pm 2 . 2. Отложите с краев по 2 конца и распределите остальные на 6 групп по 16 нитей в каждой. Postpone to the edges of the end of 2 and distribute the rest into 6 groups of 16 strands each. Теперь выполните первый ряд узора шторы. Now run the first row of pattern blinds. Для этого в каждой группе сплетите углы из двойных плоских узлов, расположенных по диагонали (рис. 2). To do this, each group weave angle of the double plane nodes located along the diagonal (Fig. 2). 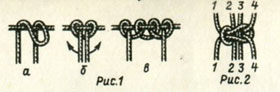 Сначала завяжите под планкой 1 узел на 7, 8, 9 и 10 концах, считая слева направо. First, tie a knot at 1 bar 7, 8, 9 and 10 ends, counting from left to right. Следующие 2 узла выполните в шахматном порядке, использовав по 2 свободных конца справа и слева. The following 2 nodes run in a checkerboard pattern, using for 2 free ends on the right and left. С каждой стороны надо сплести по 3 узла (рис. 3). On each side, must be spun at 3 knots (Fig. 3). Соседние углы соединяйте двойным плоским узлом, использовав по 2 нити от последних узлов плетенья. Adjacent angles connect the double flat knot, using for 2 threads from the last node of weaving. В первой и шестой группе крайние углы завяжите, взяв по 2 ранее отложенных конца. In the first and the sixth group of the extreme corners tie, taking on 2 previously deferred end. На четырех средних нитях между соседними углами выполните цепочки из 5 двойных плоских узлов, завязывая их на расстоянии 0,5 см друг от друга (рис. 4). The four medium-sized wires between adjacent corners, follow the chain of 5 double-flat knots, tying them at a distance of 0.5 cm from each other (Fig. 4). Отступите вниз на 1,5 см и сплетите уголки из 5 узлов на 12 свободных нитях под 1, 3 и 5 углами. Step back down to 1.5 cm and weave a piece of 5 knots to 12 free filaments at 1, 3 and 5 angles. Через 4 см выполните на этих же нитях подобные уголки в зеркальном отражении и еще через 1,5 см закончите 1, 3 и 5 фрагменты большими углами из 7 узлов. A 4 cm run on the same thread like the corners in mirror and in another 1.5 cm finished 1, 3 and 5 pieces of large angles of 7 knots. 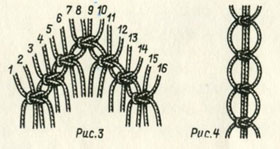 На 12 свободных нитях под 2, 4 и 6 углами выполните ажурную цепочку с кольцами (рис. 5). The 12 free filaments at 2, 4 and 6 corners do delicate chain with rings (Fig. 5). Завяжите сначала на средних четырех нитях 1 двойной плоский узел и отведите 2 крайние нити от него в стороны. You tie on the first four secondary filaments 1 twin flat knot, and take 2 Extreme yarn from him in the side. Следующий узел завяжите двумя новыми нитями на двух средних нитях от предыдущего узла и отведите в стороны крайние нити. The next tie knot with two new threads on the two middle strands of the previous node, and take part in the extreme filaments. Точно так же выполните еще 3 узла. Just follow the 3 other node. Затем проденьте в 2 средние нити шарик и под ним завяжите 5 узлов аналогично верхним. Then thread the 2 medium-sized ball of yarn and tie them under 5 knots is similar to the top. По краям цепочки образовались кольца. The edges of the chain formed a ring. Эти фрагменты также закончите уголками из 7 узлов. These fragments also finished with a piece of 7 knots. 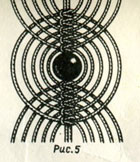 3 . 3. Второй ряд узора начните ниже первого на 2 см. Плетите его в виде ромбов, состоящих из 11 рядов двойных плоских узлов в шахматном порядке. The second row of the pattern, start below the first 2 cm Scourge of its diamond-shaped, consisting of 11 double rows of flat knots in a checkerboard pattern. Количество узлов в рядах следующее: 1-2-3-4-3-4-3-4-3-2-1. The number of nodes in the ranks of the following: 1-2-3-4-3-4-3-4-3-2-1. Всего получится 5 целых ромбов из 16 концов и по половинке ромба из 10 концов с краев полотна. Total get 5 whole diamond of 16 and ends on the half of the diamond of 10 ends with the edges of the canvas. Соседние ромбы между собой не соединяйте. Nearby diamonds between them do not connect. 4 . 4. Третий ряд узора расположите ниже второго на 2 см, повторив работу по описанию первого ряда (см. п. 2). The third row of the pattern is located below the second 2 cm by repeating the work on the description of the first series (see Section 2). Разница только в порядке расположения фрагментов: в 1, 3 и 5 фрагментах сплетите цепочки с шариками. The only difference is the arrangement of fragments: in 1, 3 and 5 passages weave a chain of balls. 5 . 5. Выполните еще 6 рядов узора, чередуя фрагменты первого и второго рядов. Perform another 6 rows of pattern, alternating pieces of the first and second rows. Выплетая второй ряд, меняйте расположение фрагментов с шариками. Vypletaya second row, change the location of the fragments with the balls. 6 . 6. Отложите с краев по 10 концов и на каждых 16 свободных концах между фрагментами последнего ряда выполните ромбы из двойных плоских узлов, расположенных в шахматном порядке. Postpone the edges of 10 ends and every 16 between the free ends of the fragments of the last row of diamonds, do double planar nodes staggered. Количество узлов в рядах следующее: 1-2-3-4-3-2-1. The number of nodes in the ranks as follows: 1-2-3-4-3-2-1. На 10 отложенных с краев концах сплетите по половинке такого ромба, расположив узлы в рядах так: 1-1-2-2-2-1-1. At the 10 pending with the edges of the ends of the weave of the half of the diamond, placing the nodes in the ranks as follows: 1-1-2-2-2-1-1. 7 . 7. На средних 4 нитях между соседними ромбами (включая по¬ловины ромбов с краев) завяжите по одному плоскому узлу, затем вденьте шарик на 2 средние нити и закрепите шарик, выполнив под ним 1 плоский узел. On average 4 wires between adjacent diamonds (including diamonds for ¬ than half the edges) tie one flat site, and then vdente the ball on the 2 secondary thread and secure the ball by running under it 1 flat knot. После этого наложите друг на друга по 2 конца под узлом и перекиньте через них 12 нитей, можно более тонких, длиной по 1 м (рис. 6). After this, apply at each other for 2 at the end of the node and perekinte through which 12 strands can be more subtle, a length of 1 m (Fig. 6). 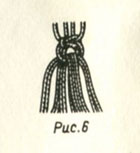
|
|
||||||||||||||||||||||||||||||||||||||||||||||||||||
 |
© 2004-2024 Journal of the modern woman Pani.kiev.ua , reprint of materials allowed only with the immediate link to / at mandatory notification editorial on e-mail. Editor project For general and administrative questions, please contact |